Creating custom Field Validator in Sitecore
This post helps you to create a custom field validator in Sitecore. This involves creating custom validator class and validator rules/items in Sitecore.
To apply any kind of validations to any Sitecore field, a validation rule needs to be applied to that field at template field level. By default Sitecore provides some validation rules which can be directly used. You can find the default validation rules under this item - /sitecore/system/Settings/Validation Rules/Field Rules.
Steps to create custom field validator
1. Creating custom validator class
If we need any new rules we need to create custom Field Validators by defining a class inheriting the Sitecore class StandardValidator as shown below.
using Sitecore.Data.Fields;
using Sitecore.Data.Validators;
using System;
using System.Runtime.Serialization;

namespace MySitecoreApp.Validators
{
    [Serializable]
    public class MyFieldValidator : StandardValidator
    {
        public MyFieldValidator() : base()
        {
        }

        public MyFieldValidator(SerializationInfo info, StreamingContext context)
            : base(info, context)
        {
        }

        protected override ValidatorResult Evaluate()
        {
            Field field = this.GetField();
            if(field.Value.Trim().ToLower() == "Hello")
            {
                this.Text = this.GetText("Improper value in the field \"{0}\".", field.DisplayName);
                return this.GetFailedResult(ValidatorResult.CriticalError);
            }

            return ValidatorResult.Valid;
        }

        protected override ValidatorResult GetMaxValidatorResult()
        {
            return ValidatorResult.Error;
        }

        public override string Name
        {
            get { return "MyFieldValidator"; }
        }
    }
}
2. Creating field validator item in Sitecore.
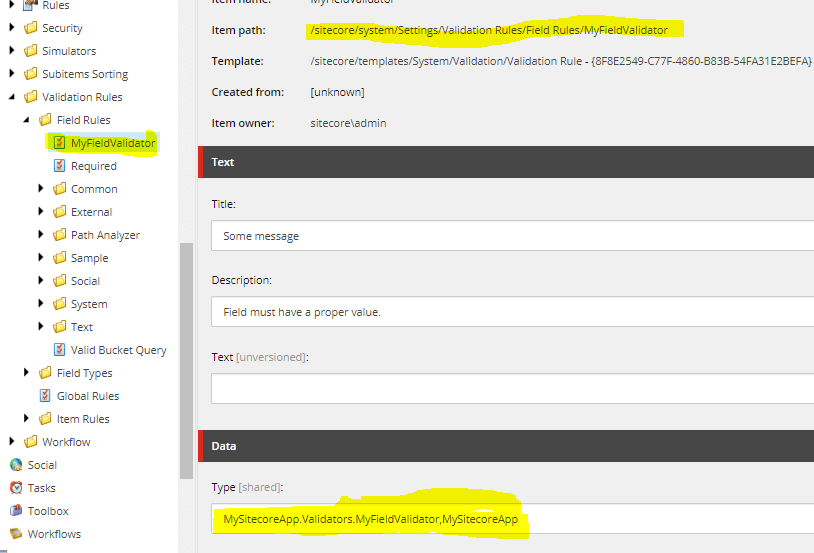
Create a validator item under the path /sitecore/system/Settings/Validation Rules/Field Rules. Provide the custom validator class name and the assembly of the class we created. i.e., MySitecoreApp.Validators.MyFieldValidator,MySitecoreAppas shown below.

3. Applying the custom field validator to a field
- Go to the Sitecore template field to which you want to apply this validator.
- Under the Data section, go to the field
Validation Barfield and select the field which we have created as shown below. Now the Title field has the validation added. This automatically applies to all the items which uses this field, and even to the templates which are inheriting this template.

4. Validation
Now go to the item which uses this field and enter some value, now the validator method (protected override ValidatorResult Evaluate() )code executes. This validation also gets executed before saving the item. Based on the ValidatorResult returned from the Evaluate() method, there are different messages displayed. The ValidatorResult can be any of the below result..
- Valid
- Suggestion
- Warning
- Error
- CriticalError (A warning appears, but still allows us to save)
- FatalError (Prevented from saving the item with a fatal error message)
Hope this helps you.


